Saturday 28 September 2019

Ulster Fry


OK, so firstly, this picture does not do justice to the delight that is the Ulster Fry.  I mean I've done some processing on the photo, but unfortunately, I took my eye off the ball when cooking this, and there's no getting away from it, almost everything on the plate is overdone.  But this blog is meant to be about the real world, and in the real world this happens sometimes...  and it was still absolutely delicious!

Also, today's blog is more of a serving suggestion than a recipe... but I wanted to bring a few of my recipes together into one meal.  Forget about calories with this one, it's a huge portion, filling treat of a weekend breakfast.

Finally, there will be many Northern Irish folk fainting at the prospect of beans on an Ulster Fry.  No, they're not traditionally part of it.  But I like them, so I say PFFT!

Ingredients (per person)
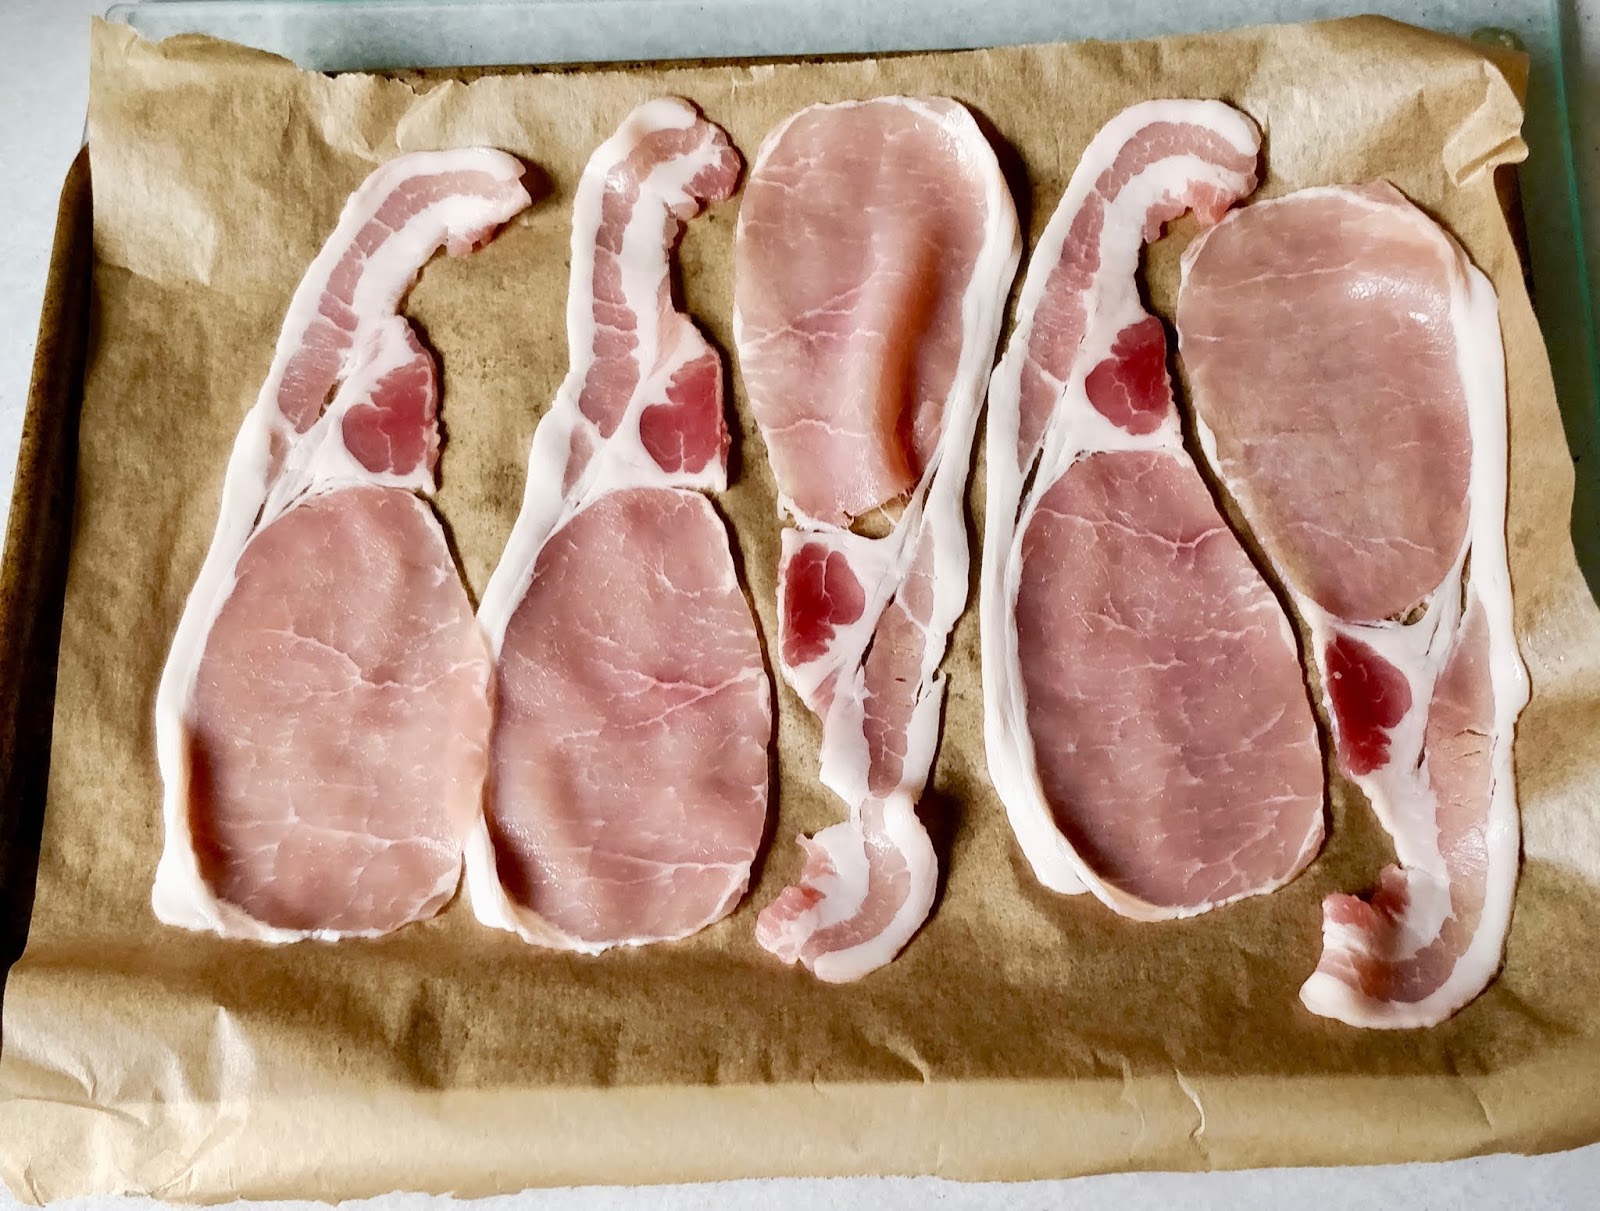
2 slices Bacon
2 slices Vegetable Roll
1/2 Soda Bread Farl
1 Potato Cake
1 Egg
100-200g Baked Beans
Brown Sauce or Ketchup (optional)

Method

Honestly, the method is simply cook everything and bung it on a plate!  But if you'd like a bit more detail...

1.  Start cooking the bacon and vegetable roll.  You can either do this by frying in a pan with a little oil, grilling, or oven baking in a hot oven.

2. When there's about 5 minutes to go on your meat, pop your beans in a saucepan and heat on a medium heat until hot.  (Or place in a microwave dish and zap in the microwave for a couple of minutes).

3.  At the same time, heat up a little oil in a frying pan and crack an egg into it.  Add the soda bread and potato cake and cook for a minute or two on each side until they're how you like them,  (You can also do the bread and potato cake by sticking them in a toaster, but that just isn't quite as nice as they come out a bit dry - although you can butter them afterwards to help with that.)

4.  Once everything is cooked, bung them on a plate, add ketchup or brown sauce to taste and get it down your neck :-)

Saturday 21 September 2019

Soda Bread Farls


I really used to miss Soda Bread, another staple Northern Irish food.  Soda bread is available in most English supermarkets, but it's always the brown/wholemeal sort, and not the delicious bread of my childhood.  Soda farls (farl refers to the shape of the bread) were briefly available in my local supermarket, but were discontinued, so I was at a loss - until I found out how incredibly quick and easy they are to make!  And it can be made in advance in batches, as it freezes really well.

Soda bread is delicious when it's cut through the middle and grilled or toasted - buttered and topped with bacon and brown sauce, or sausage and a fried egg... or my personal favourite, corned beef and melted cheddar (I can hear the discomfort of Ulster folk as I write that, but I love it!).  It's also a vital ingredient to be fried up in an Ulster Fry.

Ingredients

300g Plain Flour
1 tsp Salt
2 tsp Bicarbonate of Soda
250ml Milk
2 tsp Lemon Juice

Method

1. Stir the lemon juice into the milk, and leave to sit for about 10 minutes.  This allows the milk to curdle slightly, forming a buttermilk.  (You may just use buttermilk instead, but my local shops don't seem to have it).


2. Mix together the flour, salt and bicarbonate of soda in a bowl.


3. Make a hole in the middle of the flour mixture and add the milk mixture.


4.  Get in with your hands and mix the ingredients to form a fairly dry dough.  If your dough is sticky, add some more flour a spoon at a time.  If it becomes too dry (and starts cracking), add a splash of milk.


5. Sprinkle some flour on your work surface and turn out the dough.  Shape it into a circle about 1cm thick.  This is thinner than you expect, but remember your dough is going to puff up a bit when cooked.  Cut your circle into quarters with a knife.


6.  Heat a frying pan to a low to medium heat.  Sprinkle some flour in to the pan (the pan needs to be totally dry), then place your farls on top.  Now LEAVE IT ALONE for around 8-10 minutes until the underside is nicely coloured.


7.  Turn the farls over and cook for another 8-10 minutes on the other side.  Remove from the heat and allow the farls to cool completely before either freezing them or cooking with them.

Saturday 27 July 2019

Mexican Bean Stew


Another one of those recipes that seems too simple to put on Grubbed Up! since it's so quick and has some cheats, and it's just a staple midweek meal for us (and there's usually some leftovers for a work lunch the next day).  But I've also served this a few times to friends, and they always want to know how it was done.  It's also one of those dishes that can be served in lots of different ways... It's delicious by itself, but also fantastic when served with either rice or Fried Cauliflower Rice.  It works well on a baked potato.  If you can afford the carbs, my favourite way to have it is in wraps with some southern fried chicken goujons, sprinkled with a little grated cheese.

In the picture, I've chosen to add Quorn vegetarian steak strips to the stew.  A lot of people seem to hate Quorn, and I think that's mainly because they've had it badly cooked and ended up with a dry, chewy disappointment.  For me, Quorn only works if you cook it in a sauce, as it's when it soaks up flavours from your cooking liquid that it becomes super tasty.  Try it!  (Or if you really can't bring yourself to use Quorn, add some cooked chicken pieces instead).

Ingredients

250g chopped onions
250g sliced peppers
150g sweetcorn
400g can butter beans
400g can kidney beans
400g can chopped tomatoes
100g tomato puree
1x35g pack fajita seasoning (I use Old El Paso Smoky Barbecue)
Optional ingredients:
1 tbsp sunflower oil
300g pack Quorn chicken style pieces/vegetarian steak strips or 300g cooked chicken pieces

Method

1. Heat the sunflower oil (if using) in a wok or pan on a high heat.  Add the onions, peppers and sweetcorn (I use frozen vegetables for convenience).


2. Cook the vegetables until the onions and peppers are soft and cooked through.


3. Add the beans, tomatoes and tomato puree.  Sprinkle over the fajita seasoning and stir through.  Keep heating this until the sauce starts to bubble, then reduce the heat to a low simmer.


4.  If you are using Quorn or cooked Chicken, add it now.  You can cook these from frozen if required.

5.  Simmer the stew for 10-15 minutes and serve. (If you used frozen Quorn/Chicken, make sure it is fully heated through).  Don't overcook the stew, as the beans may start to break down and mush a bit.

Saturday 20 July 2019

Fried Cauliflower Rice

I was never convinced by the idea of cauliflower 'rice'.  And to be honest, when I first tried it, it was rank, tasteless mush, and a poor replacement for real rice.  But I persevered with it because I was trying to reduce carbs in my diet, and this was an easy alternative. This is my way of improving it, making it something I wanted to eat!  I use frozen peas, sweetcorn and onions for convenience, but you can use pretty much any vegetable you like - mushrooms, peppers, leeks, spring onions - anything you can chop finely.  You can use this in place of any savoury rice dish, like with a curry or chilli.  Or, I like to add some chopped cooked ham, bacon or chicken and have it as a meal in its own right.

Ingredients

1 whole large cauliflower, broken down into florets
100g peas
100g sweetcorn
100g chopped onions
3 tbsp soy sauce
1 tbps sunflower oil (you can make this without oil if you like)
1-2 eggs (optional)
Pinch of black pepper

Method

1. Either grate the raw cauliflower, or pulse the florets in a food processor until it is in small, rice-like pieces.

2. In a wok or frying pan, heat up the sunflower oil (if using) on a high heat.  Add the onions, peas and sweetcorn and cook for around 5 minutes until the onions are soft, stirring occasionally.

3. Add the cauliflower and black pepper to the pan, then pour over the soy sauce and stir until the soy sauce has coloured all the cauliflower evenly (it will be a light brown colour), and the vegetables are evenly spread.

4.  Cook for a further 5-10 minutes, stirring frequently, until the cauliflower is cooked.  Don't cook for too long or the cauliflower will go a bit mushy, which while it tastes OK, isn't the texture of fried rice that we're looking for.

5.  If you are using eggs, beat them first, then drizzle over the 'rice' just before the end of cooking.  Stir the egg through quickly, and they should form tiny pieces of cooked omelette, similar in size to sweetcorn kernels.  The eggs only take a very short time to cook in these small chunks - no more than a minute.

Saturday 13 July 2019

Cabbage and Bacon (or Beans)


I hesitated to even put this on Grubbed Up! because it's just too simple, and honestly, it doesn't look like it's anything special.  But then I realised that it's too delicious not to share, and it's a big portion, filling meal for two that's not too unhealthy!  It's funny, because as a child, you couldn't have paid me to eat cabbage, but now it's one of my favourite vegetables.  Using pre-prepared and frozen vegetables makes this an easy midweek dinner.  And don't be snobby about frozen or canned vegetables, they still count for your 5 a day!

If you want to make this vegetarian, it's also delicious using a can of butter beans instead of the bacon.

Ingredients
600g Baby New Potatoes (or you could use a large can of potatoes)
300g Chopped Onions (I use frozen onions, because of my laziness!)
300g Sweetcorn
8-10 rashers of bacon
Oil for frying.
Black Pepper (optional)
Butter or Low Fat Spread (optional)
HP Brown Sauce (optional)
300g Chopped Cabbage - Tesco do a pack of prepared cabbage and leek that I love for this!


Method

1. Pre-heat the oven to 180ºC.  Place the potatoes on a baking tray and stab each one with a fork.  Cook in the oven for 1 hour.


2. Turn the oven up to 220ºC.  Place the bacon on a baking tray and put into the oven with the potatoes.  Depending on how you like your bacon, it will take around 10-20 minutes to cook.  (I like the bacon snappable - but most of you will think that's massively overdone!).  Make sure you turn it over halfway through cooking or it will stick to the tray.


3. While the bacon is cooking, place a wok or pan on a high heat and get it nice and hot (You really need very little oil).  Add the onions and cook for 5 minutes until they are soft.


4. Add the sweetcorn to the wok and cook for a 2-3 more minutes. (Frozen sweetcorn takes a minute or two longer).


5. Add the cabbage to the wok, along with a good pinch of black pepper (if you like it).  Don't be tempted to stir it yet, give it about 2-3 minutes to just sit and wilt a bit in the steam of the pan.


6. Now stir the whole vegetable mix together and cook until the cabbage is completely cooked through.  You will need to keep watching this, as it can stick to the wok if you're not careful.

7. Take the potatoes from the oven and divide between two plates.  If any are particularly big, chop them into smaller pieces.  If you want to, add a little butter for flavour.


8.  Pile on your vegetables from the wok, add your bacon and HP sauce (if using) and enjoy!

Saturday 6 July 2019

Light Strawberry Tart


My husband's favourite dessert is a strawberry tart, but it's a rare treat for him as it's such a sugary thing.  This version uses lots of cheats, but is a little healthier at least!

Ingredients

1 pack ready-rolled Light Puff Pastry
400g Strawberries
4 x 160g tubs Muller Light Banana and Custard yoghurt
1 sachet Powdered Gelatine
2 tbsp Low Sugar Strawberry Jam
Low Fat Spread for greasing

Method

1.  If your pastry has been in the fridge, remove it from the box and let it come to room temperature for about 30 minutes.  (If the pastry is too cold, it's really hard to unroll.)

2.  Preheat the oven to 200-220ºC.

3.  Line a baking sheet with greaseproof baking paper.  Rub a little low fat spread over this, just to be sure your tart won't stick.


4.  Unroll the pastry sheet onto the baking paper.  Score a 1-2cm border all the way round with a knife (being careful not to cut through).  Use a fork to pierce the central area (ideally, we don't want this to rise).


5.  Place the pastry in the oven and bake for 15-20 minutes until the edge is puffed up.  Remove from the oven and allow to cool.  (Don't worry if it has puffed in the centre, just press it down with a fork.)

6.  While the pastry is cooling, cut the tops off the strawberries and halve them.


7.  Put all the yoghurt in a bowl.  In a mug, stir up the gelatine powder with a few tablespoons of boiling water.  The idea is to get the powder dissolved in as little water as you can.  Stir the gelatine into the yoghurt until combined.  Then pour the yoghurt mixture over the baked pastry case.

8.  Place the strawberry halves gently onto the tart.  Place in the fridge until the yoghurt has set (a few hours).


9.  To get a nice shine on the tart, we cheat!  Place 2 tablespoons of low sugar strawberry jam in a mug, and microwave for 30-60 seconds until it is runny.  Brush this over the strawberries on the tart and return to the fridge.  When serving, I find a pizza cutter the best tool to use to portion it.


Saturday 29 June 2019

Sugar Free Custard / Ice Cream

I'm often looking for ways to make things without sugar, as my husband is a diabetic.  Custard has always been a bit tricky, but with some experimenting, I've come up with something that works.  I wouldn't call it healthy, but it's certainly less sugary than normal custard, which was the objective!

Ingredients

400g can Coconut Milk
300ml Double Cream
5 eggs
10g Sweetener - this is optional, and the more sweetener you use, the more grainy the texture of your  custard/ice cream will be
1 tsp Vanilla Essence

Method

1.  Place the coconut milk and cream into a saucepan and heat gently.  Keep stirring until you see bubbles just starting to form at the edge of the pan.  Remove from the heat.


2.  Separate the eggs, keeping the yolks.


3.  Whisk the egg yolks until they go slightly pale.


4.  Add the egg yolks a spoonful at a time to the saucepan, making sure to stir in each spoonful until fully combined before adding the next.  (If you do this too quickly, you'll end up with sweet scrambled eggs!) . Keep going until all the egg yolks are combined - it takes a few minutes to do this.

5.  Put the pan back on the heat and heat gently, stirring all the time.  It seems to take forever, but eventually the custard will thicken.  If you're just after custard, pour it over your favourite dessert straight away... I love this just poured over sliced bananas!

6.  If you're making ice cream (or just like cold custard), pour the custard into a bowl and chill in the fridge until cold.  (To stop the custard getting a skin, put some cling film over the surface).


7.  Use an ice cream machine to turn the custard into ice cream.  Alternatively, pour the custard into a suitable dish and put in the freezer.  If you're doing it this way, take the mixture out every half hour or so and give it a good stir - this breaks up any ice crystals that form while freezing.

Saturday 15 June 2019

Fast French Onion Soup for Cheats!


Firstly - this is not the way to make french onion soup.  Seriously, it takes ages to make french onion soup properly to get that amazing onion flavour - some people say it takes 2-3 days to do right! But this cheat version can be ready in about 40 minutes, and for me it gives me enough of the essence of the real thing to satisfy.  Turn your nose up at my cheats if you like, but I love it!

Ingredients

2 tbsp oil (I use sunflower oil)
50g butter
1kg sliced onions (I use a big bag of frozen onions)
1 tbsp sugar
2-3 cloves garlic, thinly sliced (or use 3-4 tsp of powdered garlic)
1 tbsp plain flour
8-12 beef stock cubes (depends on how beefy you like it)

Method

1. Melt the butter in the saucepan and add the oil.

2. Add the onions and fry them until they go soft (about 10 minutes on a medium high heat).


3.  Add in 1 tbsp of sugar and continue to fry with the lid on until the onions start to go brown - but don't let them burn.  (If you started with frozen onions, you may want to keep the lid off as a lot more water needs to come out.) . It takes around 20-30 minutes for this, be patient.

4.  Add the garlic and flour and cook for 5 minutes more.  The flour sometimes makes the onions go a bit gloopy, if that happens add a little water to loosen them up.

5. Add 1.5 litres of boiling water from the kettle, and 8 stock cubes to the pan.  I hate crumbling oxo cubes and the way it makes my fingers feel gritty, so I have a technique... If you fold back the foil flaps carefully, and gently squeeze the cubes, you can crush them still in the packaging, so you don't have to get them all over your hands.

If you like it beefier, add some more stock cubes to taste.

6. Simmer for a few more minutes, then serve.  The classic way is to serve in a bowl and add a slice of toasted baguette with some melted cheese on top.  I sometimes just crumble a bit of cheese straight in and have some chunky bread for dipping.


Saturday 8 June 2019

Split Pea and Lentil Soup


Soups are usually really easy to make, but this one is super simple, and only has a few ingredients.  As with most soups and stews, it tastes better the day after making it too.  My version uses gammon, but if you want to make this vegetarian, you can just use vegetable stock as the base instead.

Ingredients


1 gammon joint (or use Ham or Vegetable stock cubes instead to make up a stock)
150g Yellow Split Peas
150g Red Lentils
250g Chopped Onions (frozen chopped onions are brilliant!)
3-4 large carrots (or if you're lazy - which I often am - 2 small tins of carrots)
2 tsp Garlic powder, or 2 cloves of crushed garlic (optional)

Method

1. Place the gammon joint in a saucepan and cover with boiling water.  Simmer this for 1-1.5 hours until the meat is cooked through.  You need to check this every 15-20 minutes or so, and top up the water if required.


2. Remove the meat from the saucepan (leaving the stock in the pan) and leave it to cool.  Peel and slice the carrots.  Add these to the saucepan along with the split peas and lentils.  (If you're using tinned carrots, don't add these until a few minutes before serving.)

3. Return the pan to the boil for around 30 minutes, until the all the vegetables are soft.  Add the chopped onions and garlic and simmer the soup until it thickens (keep checking this every 10-15 minutes - you don't want your peas sticking and burning on the bottom of the pan - it takes 30-60 minutes to turn into a lovely thick soup).

4. To serve, chop up or shred some of the meat and place in the soup bowl (if you're a meat eater).  Spoon out the soup on top, and serve with a chunk of your favourite bread (perhaps Soda Bread?) for dipping - easy peasy!

Tip
Split peas and red lentils are usually cheaper in the 'World Foods' aisle in the supermarket.

Saturday 1 June 2019

Tiffin


As I've said before, I hate baking, as it usually turns out disastrously...  Tiffin frees me from that, as there's no baking involved!  It's a crunchy, super-sweet indulgence of chocolate and tasty morsels and really easy to make, but it's very rich, and can only be consumed in small quantities.  This is one for sharing - I make it for my annual Eurovision party, or to take in to work for a colleague treat.

Ingredients

400g Chocolate (I usually go for dark chocolate, but any will do)
150g Digestive Biscuits
150g Maltesers
75g Raisins
150g Butter, plus a little extra for greasing
4 tbsp Golden Syrup (actually, this time I used Vanilla Syrup from theskinnyfoodco.com which worked just as well - it's there to soften the set chocolate a bit)

Method

1.  Place the biscuits in a plastic bag and smash them with something solid until they are in crumbs.  Do the same with the Maltesers.  It's nicer if there are still some small chunks, and they're not completely crushed to a powder.

2.  Break up 200g of the chocolate into a bowl and add 100g of the butter, along with 2 tbsp of the syrup.

3.  Melt and stir the mixture together.  You can do this in a microwave by heating on a medium power for 30 seconds at a time, and stirring in between, as long as you take care not to get the mixture too hot (it goes thick and lumpy if overheated).  Or you can use the classic method of stirring over a pan of simmering water until the ingredients combine.


4.  Once the mixture is just combined, add the raisins, crushed biscuits and Maltesers and stir together until distributed evenly.

5.  Line a container with baking paper, and rub a little butter all over the paper to stop the tiffin from sticking.  Pour the chocolate mixture into the container and smooth out to a layer around 1-2cm thick.  Leave this in the fridge to set for 1-2 hours.


6.  Melt the remaining 200g of chocolate, 50g of butter and 2 tbsp of syrup in the same way as before.  Pour over the set mixture to form a thin topping layer and smooth out where you can - it doesn't need to be perfect at all.  Place back in the fridge for another 1-2 hours.


7.  Once set, remove from the container and cut into small squares to serve (seriously, it's really rich, so very small mini-bites are best!).  Store the tiffin in the fridge - it will last at least a week if need be, probably even longer.

Alternative Options
I personally use Maltesers and Raisins in my tiffin, but you can use whatever you find tasty - as long as there's enough crushed biscuits to stop it going rock hard, the world is your oyster.  Chopped dried apricots or cranberries would be good.  I'm not a nut person, but if you are, you could try chopped almonds, peanuts or walnuts in the mix.  Or go crazy and add some popping candy, Crunchie bars, Rice Krispies or mini marshmallows.  Maybe try using a chocolate orange as the base, or ginger nuts as the biscuits.  Add some peppermint essence or chilli powder to the recipe if you like.  It's really up to you - the possibilities are endless.

Saturday 25 May 2019

Northern Irish Pasties


Another peculiarly Northern Irish food is the Pastie.  For the rest of the British Isles, a pastie is some sort of pastry with a savoury filling, but for the Ulsterman, it's normally battered deliciousness, available at every chippy (mmm, pastie and chips 🤤).  Even better when put in a bread roll to make a Pastie Bap!

Ingredients


500g Northern Irish Vegetable Roll
1kg Potatoes, peeled and cut into chunks (I often use frozen mash instead as a time saver)
100g Butter
2x 130g Batter Mix (yes, another cheat - but it's only about 25p a pack and saves time!)
Salt
Oil for frying

Method

1. Cover the potatoes in lightly salted water and bring to the boil.  Boil for 15-20 minutes until soft.

2. Drain the potatoes and mash with the butter until smooth.  Try to use as little butter as possible, as you want your potatoes to be fairly dry.  I'm really bad at doing mash without lumps (I have no patience!), so I use a potato ricer to get it smooth.


3. Put the vegetable roll and mash into a bowl and knead together with your hands until the mixture is an even paste.


4. Shape the mixture into balls that fit in the palm of your hand and squash slightly to make patties.  You should get around 20 from this mixture.  Place these in the fridge to chill for around 30 minutes.


5. Heat your oil in a pan (I use a wok) - if you have a deep fryer use that.  Make sure the oil is hot.

6. It's not hot enough. Wait until it's hot!  In the meantime, make up the batter mix from the pack instructions, but use slightly less water than it says to get a thick batter.

7. Coat the patties in the batter (it's easiest if you keep one hand wet and one hand dry).  Now the tricky bit... Hold the battered patty half in, half out of the oil for a few seconds, before dropping in.  This gives the batter time to set slightly before you let go, which will help it not to stick to the bottom of the pan (or basket).

8. Fry in batches of around 4 patties at a time (to prevent the oil cooling down) for around 5-7 minutes until the batter is a golden and crispy.  Turn them over in the pan halfway through cooking, to get an even colour. (Don't turn them too much, as they have a tendency to fall to bits if you do.)  Let them cool a little before eating.

It's unlikely you will eat 20 pasties in one go!  You can keep them in the fridge for a few days, and reheat in the oven at 230℃ for around 10 minutes.  They can also be frozen - double the cooking time if oven baking straight from frozen.  Oven cooking is great, as it makes the batter go extra crispy!

Alternative options

If you're not keen on deep fat frying and batter and all the mess and potential burning that goes with that, skip steps 5-8.  You can just fry the patties as they are for a few minutes on each side, and they still taste great.  Or, coat the patties in plain flour, then beaten egg, then breadcrumbs, and bake in the oven at 230℃ for about 15-20 minutes until cooked through.


Saturday 18 May 2019

Sugar Free Lemon and Lime Loaf Cake


I hate baking.  There, I've said it!  Almost every time I bake, it just doesn't come out right.  I get collapsed cakes and stodgy muffins.  They normally taste OK, but they just aren't quite right, know what I mean?

But my husband LOVES cake.  Unfortunately, he is diabetic, and cakes need sugar to give it the texture.  But do they?  After looking at many recipes and tweaking them, I have finally found a cake with no sugar, that even I can bake and comes out right every time.  And as a bonus, it's not bad on the old carbs either.

Also, I have finally discovered the two keys to baking - ALWAYS measure everything very carefully, and ALWAYS pre-heat the oven!

Ingredients


175g Low Fat Spread (or butter, if you can afford the calories!)
30g Granulated Sweetener (I prefer the taste of sucralose sweeteners - usually in yellow packaging)
225g Self Raising Flour
1 tsp Baking Powder
3 large or 4 small Eggs (beaten)
3 tbsp Lemon Juice
1 tbsp Lime Cordial

Method

1. Pre-heat the oven to 180℃.  Place the low fat spread and sweetener in a bowl.


2. Stir until they just come together and you can't see any granules left.  With an electric mixer, this only takes a few seconds.


3.  Mix the flour and baking powder together.  Add 2 tablespoons of the flour mixture and one tablespoon of beaten egg and whisk until combined.  Repeat this until all the flour mixture and egg have been combined in the mix.


4.  Add the lemon juice and lime cordial and whisk until combined.


5. Pour the mixture into a lined loaf tin.  I am lazy, and buy pre-made tin liners, but baking paper works just as well, or you can grease the tin with butter.


6.  Bake in the oven for 45 minutes to 1 hour.  It's done if you can stick a skewer in the middle and it comes out clean.  Serve in slices.